

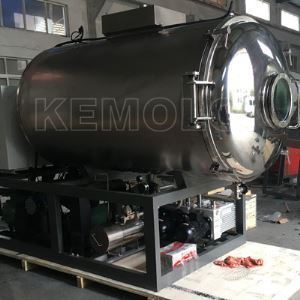
Hey there! As a supplier of Pilot Freeze Dry Machines, I often get asked about how to clean the condenser of these machines. It's a crucial part of maintenance that can significantly impact the performance and lifespan of your freeze dryer. So, let's dive right into it!
Why Cleaning the Condenser is Important
First off, why bother cleaning the condenser? Well, the condenser in a Pilot Freeze Dry Machine plays a vital role in the freeze - drying process. It helps to remove water vapor from the chamber by condensing it into ice. Over time, though, frost, dust, and other contaminants can build up on the condenser coils. This buildup can reduce the efficiency of the condenser, making it work harder and consume more energy. It can also lead to longer drying times and potentially affect the quality of the freeze - dried products.
Tools and Materials You'll Need
Before you start cleaning, gather the following tools and materials:
- A soft - bristle brush: This will be used to gently remove loose dust and debris from the condenser coils.
- Compressed air: You can use a can of compressed air or an air compressor to blow out any stubborn dirt from hard - to - reach areas.
- Cleaning solution: A mild detergent mixed with water can be used to clean the coils more thoroughly. Make sure it's a non - abrasive solution to avoid damaging the coils.
- A clean cloth or sponge: For wiping down the condenser after cleaning.
Step - by - Step Cleaning Process
Step 1: Power Off and Unplug the Machine
Safety first! Before you start any cleaning, make sure the Pilot Freeze Dry Machine is powered off and unplugged from the electrical outlet. This will prevent any electrical accidents while you're working on the condenser.
Step 2: Access the Condenser
Locate the access panel to the condenser. In most Pilot Freeze Dry Machines, this panel is usually at the back or side of the machine. Use a screwdriver to remove the screws holding the panel in place and carefully set it aside.
Step 3: Remove Loose Debris
Take your soft - bristle brush and gently brush the condenser coils to remove any loose dust, dirt, or debris. Start from the top and work your way down, being careful not to bend the delicate coils. You can also use the compressed air to blow out any debris that the brush can't reach. Hold the can of compressed air at a safe distance from the coils and use short bursts to avoid causing damage.

Step 4: Prepare the Cleaning Solution
Mix a small amount of mild detergent with water in a bucket or spray bottle. The exact ratio will depend on the strength of the detergent, but a general rule of thumb is about one tablespoon of detergent per gallon of water. Stir the solution well until the detergent is fully dissolved.
Step 5: Clean the Condenser Coils
Dip your clean cloth or sponge into the cleaning solution and wring it out so it's damp but not dripping. Gently wipe the condenser coils with the cloth or sponge, working in a circular motion. Pay special attention to areas with heavy dirt or grime. If you're using a spray bottle, spray the cleaning solution directly onto the coils and then wipe them clean with the cloth.
Step 6: Rinse the Coils
After cleaning the coils with the detergent solution, use a clean, damp cloth to rinse off any remaining detergent. Make sure to remove all traces of the cleaning solution to prevent it from leaving a residue on the coils.
Step 7: Dry the Condenser
Use a dry cloth or allow the condenser to air - dry completely before reassembling the machine. This will help prevent rust and corrosion on the coils.
Step 8: Reassemble the Machine
Once the condenser is dry, carefully replace the access panel and secure it with the screws. Make sure the panel is properly aligned and tightened to prevent any air leaks.
Step 9: Plug in and Test the Machine
After reassembling the machine, plug it back into the electrical outlet and power it on. Check to make sure the machine is running smoothly and that the condenser is functioning properly.
Tips for Maintaining a Clean Condenser
- Regular Inspections: Check the condenser regularly for signs of dirt or debris buildup. A quick visual inspection every few weeks can help you catch any problems early on.
- Keep the Area Around the Machine Clean: Make sure the area where the Pilot Freeze Dry Machine is located is clean and free of dust and debris. This will reduce the amount of dirt that can enter the machine and accumulate on the condenser.
- Use a Dust Filter: Consider installing a dust filter on the intake of the machine to trap dust and other particles before they reach the condenser.
Applications of Pilot Freeze Dry Machines
Pilot Freeze Dry Machines have a wide range of applications. For example, if you're in the food industry, you might be interested in our Chicken Breast Freeze Dryer. It's specifically designed to freeze - dry chicken breasts while preserving their nutritional value and flavor.
In addition, Freeze Dried Dehydrated Food is becoming increasingly popular due to its long shelf - life and convenience. Our Pilot Freeze Dry Machines can be used to produce high - quality freeze - dried dehydrated foods.
Another exciting application is Microwave Assisted Freeze Drying. This technology combines the benefits of freeze - drying with the speed of microwave heating, resulting in faster drying times and better product quality.
Conclusion
Cleaning the condenser of your Pilot Freeze Dry Machine is an important part of maintenance that can keep your machine running efficiently and extend its lifespan. By following the steps outlined in this blog post and implementing some simple maintenance tips, you can ensure that your condenser stays clean and your freeze dryer performs at its best.
If you're interested in purchasing a Pilot Freeze Dry Machine or have any questions about our products, feel free to reach out to us. We're here to help you with all your freeze - drying needs!
References
- "Freeze Drying Technology: Principles and Practice" by John W. King
- "Handbook of Food Dehydration" edited by Mohammad Shafiur Rahman